How to Install Gas Struts on Camper Trailer: Upgrade Your Camper
Lifting heavy camper trailer lids and beds can be a strenuous task. Fortunately, gas struts offer a practical solution to this challenge. These self-contained lifting mechanisms utilize compressed gas, typically nitrogen, to assist in effortlessly opening and closing the trailer.
The core functionality of a gas strut is based on the principle of gas pressure. It ensures smooth operation, minimizes stress on hinges, contributes to extended lifespan and reduced maintenance requirements. It reduces the risk of injury by eliminating the need for manual exertion.
Now if you want to install gas struts on the camper trailer, stick to this comprehensive article till the end.
What to Do Before Installing Gas Struts on Camper Trailer?
Before commencing the installation process, you need to focus on some preparatory measures. Overlooking these steps can lead to complications and potential safety hazards. Therefore, it’s important to take a methodical approach.
Get Yourself Secured
You should maintain safety when working on any DIY project, especially one involving heavy components like camper trailer lids or beds. If you’re about to drill near electrical components, always turn off your camper’s battery to eliminate the risk of sparks or shocks. Wear proper safety gear. Finally, ensure you have a stable, level work surface that’s well-lit and free of clutter to prevent accidents.
Choose the Right Gas Struts
Selecting the appropriate gas struts is crucial for a successful installation. Here’s what you need to consider –
Measure the Opening Distance: Measure the distance between the fully closed and fully open positions of your camper lid or bed. This will determine the required length of the gas struts.
Calculate the Required Force: Gas struts are rated by the amount of force they can provide, typically measured in Newtons (N) or pounds (lbs).
To calculate the required force, you’ll need to consider the weight of the lid or bed, as well as the desired level of lifting assistance. As a general rule of thumb, you’ll want to choose gas struts with a force rating that’s slightly higher than the weight of the component you’re lifting.
Select the Appropriate End Connectors: Gas struts come with different end connectors, such as balls, studs, or eyes. Make sure to select gas struts with end connectors that are compatible with your camper’s mounting points or brackets.
Locate Mounting Points
Finding the perfect spots for your gas struts is key to a smooth installation and happy travels. First, make sure there’s enough breathing room for the struts when the lid or bed is all the way open and closed.
Second, find strong, secure spots on both the camper body and the lid/bed where the brackets can be firmly attached. Finally, aim for easily accessible locations – you want to be able to install and care for the gas struts without messing with the camper.
Tools and Materials Needed for Installation Depending on Trailer and Chosen Gas Struts
Before commencing gas strut installation, ensure you have gathered all the necessary tools and materials. The following checklist provides a starting point –
- Safety Equipment: Gloves and safety glasses are essential for protecting your hands and eyes during the installation process.
- Drilling Equipment: A drill and appropriate drill bits are required to create holes for the mounting brackets. Select drill bit sizes that match the bracket hardware.
- Fasteners: Wrenches and screwdrivers will be needed to secure the mounting brackets and gas struts.
- Mounting Brackets: These may be included with the gas struts or purchased separately. Choose brackets compatible with your camper trailer and gas strut selection.
- Optional Sealant: Applying a sealant around the bracket mounting points can enhance weatherproofing.
It’s important to note that the specific tools and materials required may vary depending on your camper trailer model and the chosen gas struts. However, this guide will provide detailed step-by-step instructions to assist you in identifying the necessary components for your unique setup.
How Do You Install Gas Struts on Camper Trailer?
If everything is prepared, follow these step-by-step instructions, and you’ll have those gas struts installed like a pro in no time.
Step 1: Mark the Mounting Points
First things first, we need to mark the exact locations where the gas strut brackets will be mounted.
- Place the brackets on the chosen mounting locations, make sure they’re level and aligned correctly.
- Use a pencil or marker to mark the screw holes on the camper body and lid/bed where you’ll be drilling.
- Before you start drilling, double-check that the brackets are properly aligned and that there’s enough clearance for the gas struts to operate smoothly.
Step 2: Drill the Holes
With the mounting points marked, it’s time to break out the drill and get those holes ready.
- Make sure you’re using the appropriate drill bit size for the mounting hardware (screws or bolts) that came with your gas struts or brackets.
- Depending on the material of your camper body and lid/bed, you may need to drill pilot holes first before making the final holes.
- For the mounting points on the camper body, you’ll need to drill completely through the surface. Be careful not to damage any internal components.
- If you’re concerned about water and moisture getting into the holes, you can apply a sealant around the edges after drilling.
Step 3: Attach the Brackets
Now that the holes are drilled, it’s time to secure those brackets in place.
- Using the appropriate screws or bolts, attach the brackets to the camper body and lid/bed at the mounting points you’ve just drilled.
- Make sure to tighten the hardware securely, but be careful not to over-tighten, as this could strip the threads or damage the material.
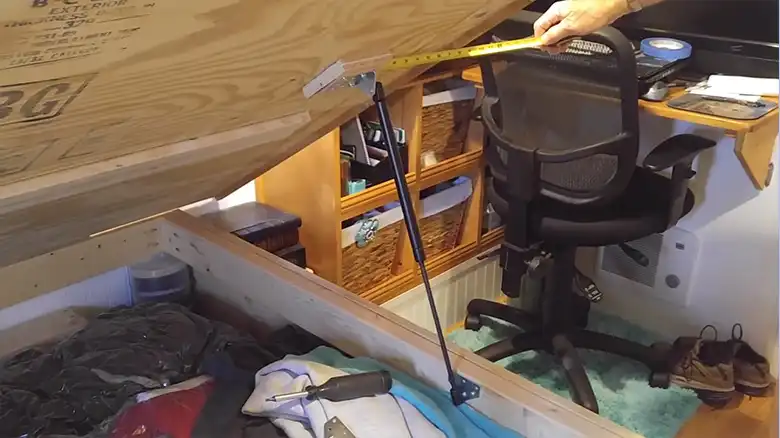
Step 4: Install the Gas Struts
Finally, it’s time to install those gas struts!
- Depending on the type of gas strut you’ve purchased, you may need to compress it slightly before installation. Refer to the manufacturer’s instructions for the proper technique.
- With the gas strut compressed (if required), attach one end to the lower bracket on the camper body. Make sure it’s securely in place.
- Carefully extend the gas strut and attach the other end to the upper bracket on the lid or bed. Double-check that both ends are properly secured.
And just like that, you’ve successfully installed your brand-new gas struts! Give yourself a well-deserved pat on the back, my friend.
What to Do After Installing Gas Struts on Camper Trailer?
All right, you’ve made it through the installation process! However, a few crucial steps remain to ensure your gas struts function optimally and to finalize the project successfully.
Check the Operation
After all your effort, it’s time to see how those gas struts perform! Slowly open and close the lid or bed, observe how they assist the movement. Ideally, they should provide smooth, consistent lifting help throughout the entire process. Watch closely for any binding or misalignment that might cause the gas struts to rub or catch on other components.
Make Necessary Adjustments
If you encounter problems during the operation check, don’t worry! A few tweaks can have those gas struts functioning flawlessly. If misalignment or rubbing occurs, loosen the bracket hardware and reposition them slightly.
In some instances, spacers or shims might be necessary to create additional clearance between the gas struts and other components. Finally, if you skipped it during installation, consider applying sealant around the screw holes for an extra layer of weatherproofing.
That’s it!
Related FAQs
Can I install gas struts on an existing camper trailer, or is it only suitable for new trailers?
Absolutely! Gas struts can be retrofitted onto existing camper trailers, regardless of their age or model. As long as you have suitable mounting points and follow the proper installation procedures, you can enjoy the benefits of gas strut assistance on your current rig.
How often do gas struts need to be replaced or serviced?
The lifespan of gas struts can vary depending on factors such as usage, environmental conditions, and proper installation. However, most manufacturers recommend replacing them every 5-7 years or when you start to notice a significant decrease in their lifting performance. Regular inspections and maintenance can also help extend their lifespan.
Can I install gas struts on other components of my camper trailer, like the entry door or storage compartments?
Definitely! Gas struts can be used to assist with the opening and closing of various components on your camper trailer, not just the main lid or bed. Entry doors, storage compartments, and even awnings can benefit from the smooth operation and lifting assistance provided by gas struts. Just make sure to choose the appropriate size and force rating for each application.
Wrapping It Up
Alright campers, we’ve made it! No more backaches or injuries – these handy little guys become your lifting buddies whenever needed. Gas struts also protect your camper’s other parts, keeping your rig in top shape for longer. Plus, their smooth operation adds a touch of luxury to your camping adventures. So give yourself a pat on the back for a successful upgrade!
And if you ever have questions or need a hand down the road, reach out or leave a comment below. We’re always here to support your camper trailer adventures. Happy camping, everyone!